Saturday, August 27, 2011

Halloweens Past

With Halloween rapidly approaching I have been doing lots of planning for this year's Halloween! I am super excited about what I have come up with! I love having a family theme! So we will have one yet again. I will reveal it soon... just not QUITE yet. Let's see if you will be able to guess :o)

I also realized I have never posted my pictures of my last two year's worth of Halloween pictures! So here goes...

Nick (my husband)'s favorite book as a child was "Where the Wild Things Are" so I knew once i started sewing that Hayden's first Halloween he HAD to be the main Wild Thing. Since i was pretty knew to sewing it's a bit rough, but i was (and am!) so insanely proud of how it turned out. The onesie is made of two fabrics i sewed together. Then embroidered. The pants are a pair of Carter's stretchy pants covered in rows of gray triangles. I also appliqued WILD THING on the front. The head band is a crocheted fur yarn with stuffed horns attached and on the socks i put little claws. He was totally a hit and looked SOOOOO cute!

Then last Halloween, we had TWO little monsters and I really wanted to do a family theme. So i wracked my brain and after a trip to Joanns and seeing this pattern I knew what I was going to make the Tanner Family Circus. So i made Hayden and Elephant, Eldon a lion, Nick the Ringleader, and I was a gypsy (i am afraid of clowns so our circus wasn't allowed to have any clowns).  I LOVED the way the costumes turned out. I even won $40 at the Base Kid's Halloween Party. That was pretty awesome!.


I also HAD to make the boys Halloween shirts (and romper) for the little boys. I was pretty excited about Halloween last year. This year i am going to make a tie for Eldon and a bowtie for Hayden. (H is obsessed with bowties). So these are their little shirts!

Friday, August 26, 2011

No-mess Bib II


I made another "no-mess bib." I also tried to throw together a bit of a rough tutorial for if anyone wanted to make one. I love this so much! It could easily be modified for any type of chair. If anyone wants me pattern i can scan it in, just let me know! The directions are in the pictures!

I'm so glad i found my bias tape! I love the bias tape version even better than the bib here. I had lost the tape before, but i really like both version. I made this one with a little more "extra" space because the last one was a wee-tight for my wiggling little guy. He kept popping the snaps off! I can't tell you how much i love this bib! If you have a chair like this... IT IS A MUST!


(i love my little model! :o))

Thursday, August 25, 2011

Happy Anniversary

Happy Anniversary to my wonderful husband and me! :o)

Here's us over the past FOUR years:

And now... what a lucky girl i am!

Oh, and my iron broke... so i am waiting on a new one. I never knew how much i needed an iron until i didn't have one. So... more sewing to come... :)

Monday, August 22, 2011

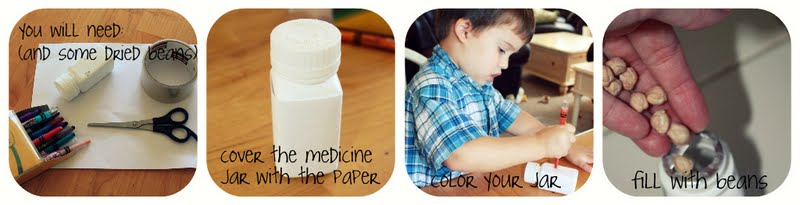
Medicine Jar Maracas

As part of our typical, playtime Monday activity we made medicine jar Maracas Hayden really wanted in on the action and Eldon loves shaking things and making noise. The boys had a ton of fun! It occupied them for AT LEAST half an hour while i finished up some dishes! They make me smile!

So, what are you waiting for? Make some of your own!
AND DANCE!!!

Saturday, August 20, 2011

Little Boy Short

Yesterday was our baby's birthday! So i figured here is the tutorial for his birthday shorts... and the other two pairs i have made! To see the original go here. Happy Birthday Eldie!!! We Love You!
* ~ ~ * ~ ~ * ~ ~ * ~ ~ * ~ ~ * ~ ~ * ~ ~ * ~ ~ * ~ ~ * ~ ~ * ~ ~ * ~ ~ * ~ ~ * ~ ~ * ~ ~ * ~ ~ * ~ ~ *

I made another pair of super cute Hayden shorts!!I love these shorts. Really love them. They are so simple to make and if you left out the pockets, they would be about 3 steps! Really easy. The pockets are a bit confusing at first, but once you figure them out they are a breeze {and super cute}. I love the Twill material! Really quality! He's darling!


Are you ready to make some super cute shorts? I know there seems like a million steps, but i wanted to make it SO understandable! It's really easy! Promise! You will need:

  • about 3/4 yard main fabric for 3T
  • fat quarter lining fabric
  • 1 1/4 inch elastic
  • (and normal sewing supplies)

  1. Trace shorts-front, back, pockets {Or print out mine}
  2. Cut out pieces. Set aside. {I like to keep them with their label on top-especially the short front and back. It can be confusing}
  3. Take pocket pieces {all 6} separate one lining with two tops.
  4. Iron top pieces over about 3/8 inch.
  5. Place piece on top of lining and pin.
  6. Edge stitch as close to the edge as you can {without missing the fabric, of course}
  7. Trim Edges of shorts so the wlining and main fabrics match
  8. Fold shorts so the “wrong” sides and facing {the two pure lining sides}
  9. Pin and sew ½ from the bottom side {we are doing a French seam}
  10. Now turn “inside out” {turn the opposite way} so that the two main fabric pieces on each pocket are facing each other. Iron and pin the bottom.  Sew 3/8" from the bottom {encasing seam allowance}{honestly, you don’t need to pin . Look at the bottom once you have turned it inside out. You see the ½ of fabric that is darker and about 3 times as thick. That is what you need to encase. Sew along this}
  11. Set pockets aside.
  12. Grab the front main pieces. Sew up the center of these pieces. Repeat for back pieces.
  13. Press the seam to one side and stitch about ¼ inch from the center seam down the short piece.
  14. Grab your pockets. This will be the hardest part of the tutorial. Take the front piece of the pocket and place it on the front of the short.
  15. Now take the piece that is NOT touching the short and pin it. Sew about 3 inches.
  16. Clip the top and bottom of the stitching pocket.
  17. Flip around {creating a French seam} and sew about 3/8” in from the edge encasing the raw edges.
  18. Now the next two steps are helper steps:
    1. First, straighten up the front piece and pin your pockets in place This way they won’t move around when you are sewing the bottom pieces of your shorts.
    2. Next, take your pockets and stitch a satin stitch at the top of the opening of the pocket and the bottom of the opening. This will keep the two pieces of the pocket together sturdily AND make it easier to sew with.
  19. Now pin together the lower leg opening. Sew or Serge.
  20. Next, match up the front and back sides of the shorts. Make sure to line up the back side of the pocket with the back. Sew down the two sides seams making sure to miss your pocket.
  21. Check to make sure you didn’t accidently stitch the pocket. Serge Short.
  22. Iron the seam allowance the opposite way of the pocket. Stitch ¼” from the seam.
  23. Now to hem the short. Fold the fabric over 1/4" then again 1/2". Edge stitch along the INSIDE of the short. This guarantees you hit the inside and make a nice clean hem.
  24. Now to the waistband. Fold the fabric over 1/2 inch. Then fold again 1 3/4". You might have to trim a little length of the top depending on how long your top piece was. You need you waistband to hit at the top of your pockets, so you sew them in as you sew the waistband.
  25. Edge stitch along the inside of the waistband leaving approx 2" for the elastic.
  26. Cut elastic to desired length (measure around child or pre-exisiting short). Stick a safety pin through the end of the elastic and thread through casing.
  27. Overlap ends of elastic and zigzag together (zigzag has some give--making it better suited to elastic)
  28. Sew casing shut.
  29. No one wants their elastic to move around too much and if you look at most of your boy's professional shorts you will see a chainstitch running through the waistband. If you have a coverhem machine use that, but if not i will teach you how to make it LOOK like you did.
  30. Grab your short. Change your stitch length to 5.0mm (the longest on my machine).
  31. Using your foot as a guide, stitch 1/2 inch from the top of the short through the waistband. As you continue through the short, stretch the elastic and waistband fabric so there are no gathers. Go all the way around the short.
  32. Repeat ever 1/2 inch until you have completed the waistband!
  33. Cut your threads and TA-DA! You are done! Look at those awesome shorts you made! Put them on your babies and... as always... take WAY too many pictures!!
  34. I really want to make a million more!!!


    Thursday, August 18, 2011

    Train Wreck

    Literally y'all... this is a train wreck. I spent ALL day making a cake. And it turned out like this:


    Scary, i know. It looks like something a two-year-old made. And although i would like to blame it all on Hayden, i can't. :o( So i think i am officially never making a cake for a kid again. ColdStone here i come.

    At least it will taste good. Look bad, taste good.

    I think i'm gonna stick to sewing....

    Wednesday, August 17, 2011

    Simple Headband

    I am about to be an Aunt... again! To a little girl! The first little girl since i started sewing {well, the first kid that wasn't mine since i started sewing...} and as you already know, i am super excited! SO of course i had to make some head wear from my beautiful little niece.

    This headband was BEYOND simple! I just bought the flowered fabric from the trimmings section in Joann, added some elastic i already owned, sewed them together, and VOILE! I have a beautiful headband!

    What you need:
    Some sort of trimming
    8" (for 3 month) 1/4" elastic
    Needle and Thread

    please excuse the hairy model... i happen to be the only girl in the house :)

    I can hardly wait to see it on her {or to see her, for that matter!}